MPC Beats is specially designed to work hand in hand with any Akai controller, although the software will also work with any other brand of MIDI controller through additional mapping.
What does it include Akai Pro MPC Beats?
It comes with a large library of expandable sounds so you can create and develop whatever your style is, Techno, House, Trap, Hip Hop, Reggaeton, etc. In addition, the Akai Pro catalog is constantly updated.
The Akai MPCBeats can work as a plugin inside other digital audio workstation, such as Ableton, Cubase, Logic Pro and FL Studio (VST, AU and AAX).
From másvolumenporfavor.com we bring you an extensive guide to MPC Beats and a tutorial a little further on so you can learn how to make your first beat with this fantastic DAW.
Akai Pro MPC Beats Features
- 16 Pads for triggering drum samples and loops Piano Roll to record MIDI notes and compose your own chords or melodies
- Sample Editor to create your own kits
- Browser to find any sound easily
- Track inspector with information about all the files you are working on
- Compatibility with most music production programs.
The 4 keys to MPC Beats VST
- Sequences:
A sequence is a «building block» of a song, containing several tracks that play at the same time. Likewise in a project, you can create a sequence for your verse and another sequence for your chorus, alternating them with each other and/or repeating each of them in a specific order.
- MIDI track:
As usual, a MIDI track is a layer in a sequence. These tracks consist of MIDI data only, not audio data. Unlike a conventional DAW, each MIDI track exists only in its sequence, so the advantage of this is not having to manage empty or unwanted tracks in all your sequences.
- Audio track:
Audio tracks consist of a recorded audio signal, just like in a traditional DAW. Unlike MIDI tracks, audio tracks are present in every sequence in the project, even if the tracks are empty.
- Program:
A program is a preset through which MIDI tracks are routed. Programs can contain audio samples that are triggered when tracks are played through them, producing the sound you want on that track. Programs are independent of tracks and sequences, so you can set up multiple tracks to use the same program (unlike normal DAWs where each track requires its own set of samples or plug-ins).
How is Akai Pro MPC Beats different from other DAWs?
One of the main differences from other traditional digital audio workstations is the MPC workflow. Compared to most typical DAWs, each track uses one instance of each instrument, and all tracks are always playing, even if they don’t contain any audio or MIDI information.
In addition, your entire project has to be arranged just as the resulting song would be. This is not the case with MPC software, which offers much more flexibility within your project.
What are the MPC Beats Free Expansions pack and where can I download them?
Akai mpc-beats software expansions packs contain their best sample collections, they are the best sellers from leading sound designers in the music industry, from Araab Mukik & Motif Alumni to MSX Audio and F9 Instruments (the latter is free).
You can pre-listen from their official website and download online the one you like the most, prices range from $10 to $50.
Connection and installation, MPC Beats manual
If you plan to work only with the akaipro mpc beats software, you shouldn’t pay much attention to the following diagram. However, we think it’s a good idea to show it to you in case you decide to expand your studio, so that you can evaluate the possibilities offered by an Akai controller.
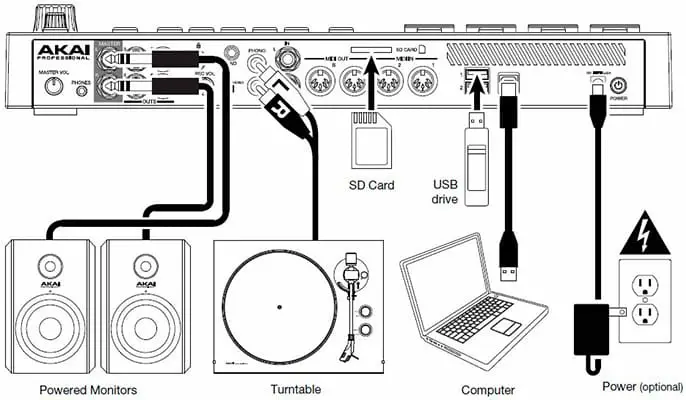
To download this free music production software you have to register on the Akai website, then they will send you an email with MPCBeats in a compressed file attached for online download. Once installed the first thing the software asks you to do when you start it is to connect a MIDI device (it is not necessary to have one but as you will see later it is highly recommended for an optimal workflow).
The MIDI Controller can be of any other brand as mentioned above, it has pre-defined mappings for 8 of them in particular, for example: Ableton PUSH2, Alesis, Arturia, Korg, M-Audio, Native Instruments and Novation. If you don’t have any of the above, it’s no problem, you can create a mapping from scratch at any time.
(In case you use a MIDI controller other than Akai, make sure that the MIDI input options «master, control and track» are checked in the «Preferences/MIDI routing» editor.
Finally this modest DAW for Beatmakers asks you if you want to start in simple or advanced mode, depending on the option you choose you will be shown different parts of the MPC software, the advanced mode being the best to maximize the workflow. In fact, you can start with the advanced mode because with this review we have prepared a guide/manual in English to get you started.
MPC Beats manual & download software
You can download the program for free from here.
MPC Beats Tutorial: How to use
Now that you have finished the setup let’s see how to use mpc beats. The first thing you have to decide with a window with different templates and music genres, is which one you will start your project with.
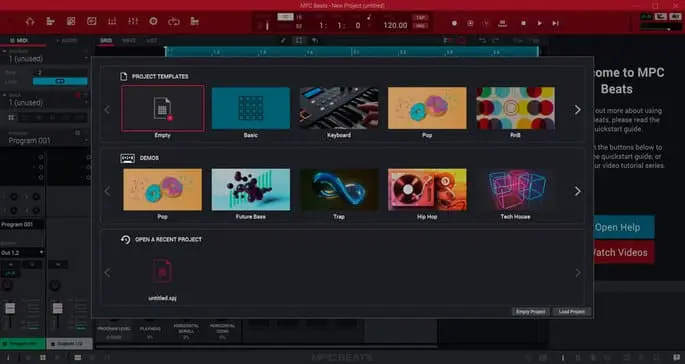
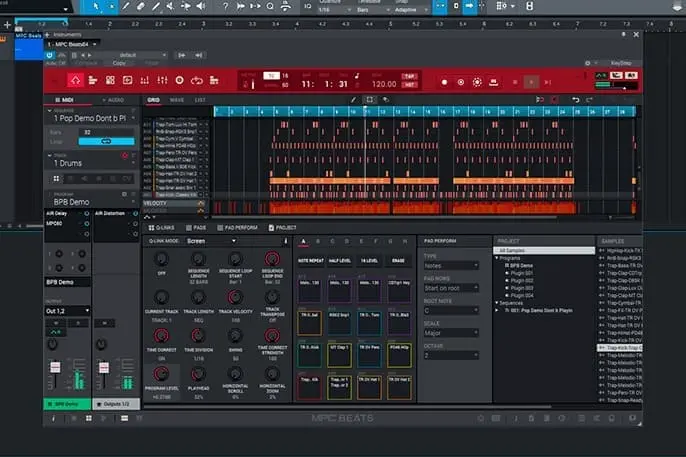
The MPC Beats interface
At first the interface may seem a bit confusing, but if you follow our step-by-step guide you will see that it is simpler than it looks.
Work areas:
To start this mpc beats tutorial let’s review its main working area.
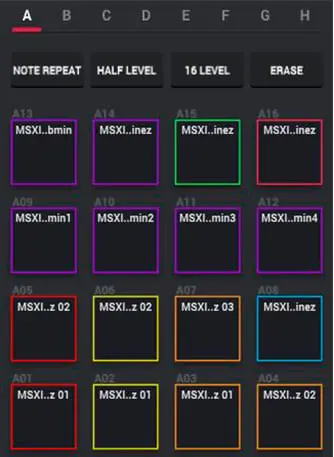
The Pads area:
In the pad area you will find the sounds loaded and differentiated by colors to make it easier to locate and read them, in this section you have buttons such as «Note repeat» to execute repetitions of notes and add more character to your elements (a technique widely used in genres such as hip-hop to generate mpc beats).
Q-LINK panel:
To the left of the pads you have the Q-Link settings, to provide extra functionality such as adjusting the quantization to make your beats sound in tempo, the swing to add humanization to your rhythms, loop duration, and much more.
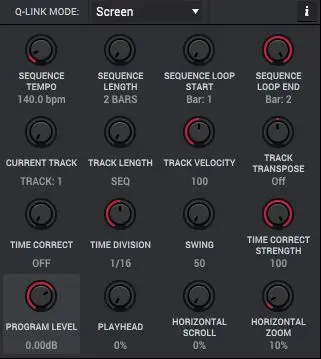
Remember, If you work with an Akai MIDI controller you will see that the settings are automatically pre-assigned to the knobs of your device, this makes things much easier for you but if you prefer you can modify them to your liking.
Grid:
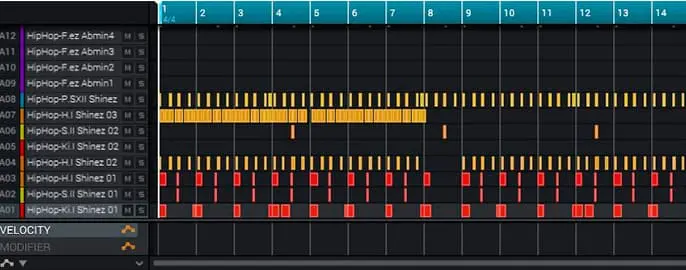
The grid area is where you will spend most of your time working, you can play MIDI notes live with your controller or paint them with a pencil if you need to. You can make edits such as copy, cut, paste or erase. As you will notice in the image below, everything is very visual thanks to the colors that differentiate the sounds.
Automation Area:
Just below the grid you have an area where you can adjust the velocity, panning or create and modify automations.

Central transport bar:
The transport bar is located at the top of the interface, in the center you have a view of the tempo, beat or swing and the option to activate the metronome. You can also execute controls such as play, stop or record the track.

Lateral transport:
On the left you will see the second part of the transport bar, from left to right you can click the:
- Home button returns you to the main screen whenever you select it.
- Track mode to see all your tracks at a glance
- Program mode allows you to edit the selected drum kits (change tonalities, modify envelopes, add filters).
- Sample editing with functions such as cut, paste, fade in/out, reverse, etc.
- Pad and channel mixer levels the volume and panning in the channels of your elements, together or separately
- Sampler and Loop lets you record your own samples and repeat them in a loop
- Track muting to mute specific parts of the track
Track inspector:
Located on the left side, the track inspector will store all relevant info about your track. It shows you the type of sound you are manipulating (if it is MIDI or Audio), key information such as the sequence name, the track name and the type of track, such as drum instruments, plugins, samples, etc.
A little further down you have the area for inserting effects, returns and the mixer. We accompany this explanation with an infographic and below its relevant explanations.
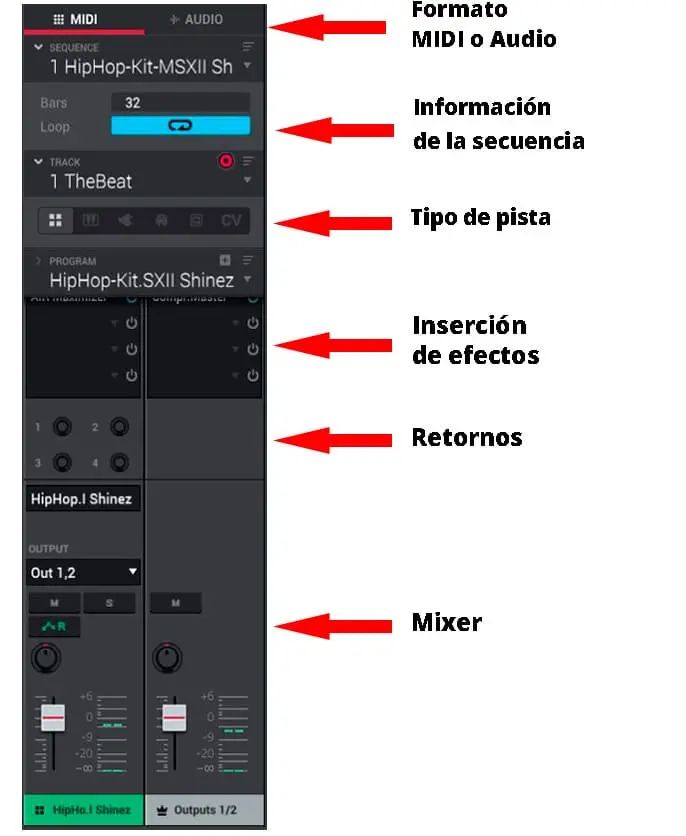
Midi and Audio format:
MPC Beats has 8 MIDI tracks for beats and instruments and 2 stereo audio tracks where you can load already recorded sounds and adjust their timestrech. As for the number of tracks available, they may seem few, but we assure you that having a limited number of tracks will have a very positive and creative effect on the way you produce music that will surprise you.
Sequence information:
Use it to know how many bars you are working on the loop.
Type of track:
Toggle between viewing the grid, the piano roll, the plugin controls you have activated or the clips.
Returns:
By clicking and rotating on them you can adjust the amount of effect per return you want to apply.
Mixer:
From here you control the volume and panning of all your MIDI and audio tracks, including the master. At the top of the channels you will find the effects insertion area where you can choose from over 100 effects (Dynamics, Reverb, Delays, Eq, modulation, harmonization and classic fx).
Lower navigator (right side):
Here you can manage your entire MPC Beats sound library and pre-listen to your installed expansions.
![]()
So far the analysis of the MPC Beats interface, at first the information displayed may seem overwhelming but you can see that it concentrates all the parameters that can incorporate any DAW in a very well used and organized way.
The MPC software is ideal for beatmakers but it also has all the tools you may need to produce a track from 0 to 100. However, we want to share with you a small tutorial in Spanish of MPC Betas to guide you in your first song.
What do you think, for a DAW of these features with which you don’t have to spend a single dollar, it’s very complete, isn’t it?
To continue learning you can do it with the tutorials of the mpc beats academy, currently you have 20 videos that are more than enough to get you started with ease with this software.
Mpc Beats Academy link to the page.
MPC Beats review
As you have been able to observe the best program to make beats is the Akai software. The truth is that for being a free music production software it is not very well known, and after having tried it we thought it was a good idea to help spread the word about it.
To the mpc beats vs ableton comparison, we are sorry to say that there is no comparison. Ableton is the king of music production software at the moment. Anyway to start in the world of production you can do it with the free Akai software, if you like it and want to go further you can go to Live.
We will continue to expand the information in this guide as we come across possible cases of interest to all of you. If you know someone who might find it interesting, do not hesitate to share this post and as always, if you have any questions you can leave a comment here.

